Managing Your Hosting Account from Client Portal
- Managing your Plesk Hosting Account through your Customer Portal
- Add a domain to your hosting service
- Create a Database
- Add Domain Aliases
- Manage DNS settings
- Email Accounts
- Email Forwarding
- FTP Access
- Disk Space Utilization
Managing your Plesk Hosting Account through Your Customer Portal
For managing your hosting panel through the client Area follow the below-mentioned steps:-
Step:1 Once you log in to your client area https://manage.diadem.in/clientarea.php clicks on the Services.

Step:2 Then click on the selected service for which you want to manage the services from the client area.

Step:3 Now you can manage all your services from your client area login.

Step:4 Further, you can directly login to your Plesk panel without authentication through client area login.
 ______________________________________________________________________________________________________________________________________________________________
Step:1 Click on Addon Domain.

Step:2 Now Click on Create Addon Domain.

Step:3 Press the 'Create Addon Domain' button and enter the desired details. Please note that an FTP account will not be automatically created with the domain.
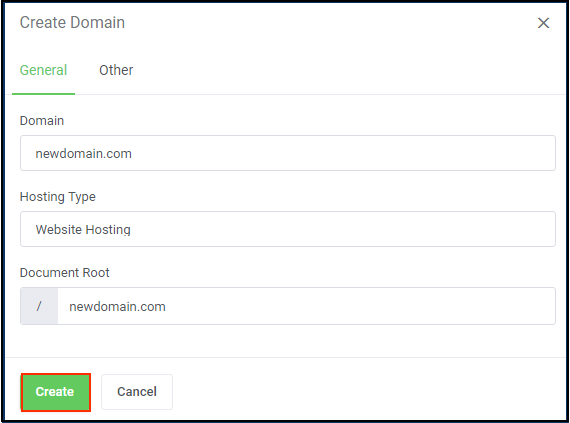
Step:4 Now your domain is added.
 __________________________________________________________________________________________________________________________________________________
Step:1 For creating the database click on the Database tab.

Step:2 Owing to 'Databases' management you can create/delete new databases and users. Press 'Create Database' to add a new database.

Step:3 You can also delete already assigned users as well as add new ones to particular databases by choosing 'Create Database User' in the 'Users' tab.
 _______________________________________________________________________________________________________________________________________________
Step:1 For adding Domain Aliases you may click on Domain Aliases Tab.

Here you can add and manage your domain aliases. This allows you to read the content of one domain from another domain name. To create a new redirection, press 'Create Domain Alias'.
Note: that domains should be registered with a valid registrar and point to your DNS server.

Step:2 Next, provide your alias domain, chose domain redirections as well as toggle the remaining options.

Step:3 After alias creation, you can also rename it, change its settings, or delete it.
 _________________________________________________________________________________________________________________________________________________
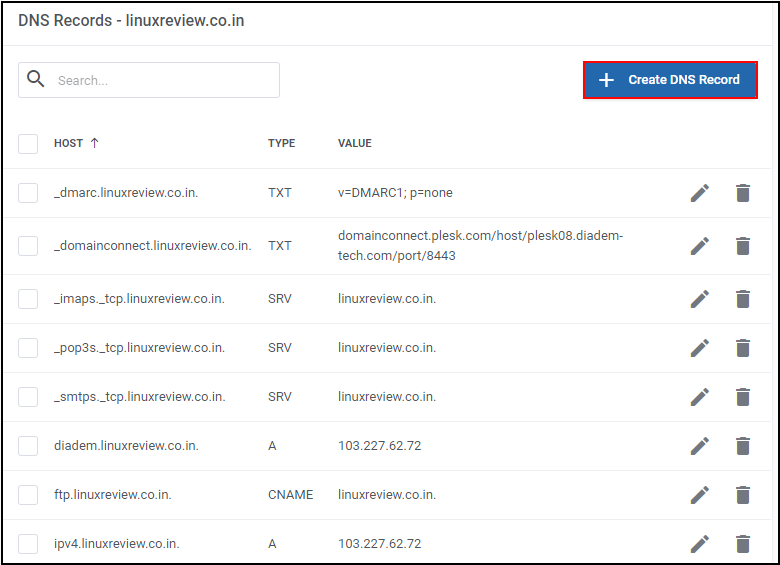
Step:1 For managing DNS settings you may click on to DNS tab under Manage Account Section.

Step:2 You can add and manage DNS records to define the structure and content of the chosen domain namespace.

Step:3 Add records by selecting the type and providing their hostname and value.
 ___________________________________________________________________________________________________________________________________________________
Step:1 For email account creation click on the Email Addresses tab under Manage Account Section.

Step:2 View and edit email accounts that are associated with your domains. Use the filter to find required email addresses, preview its selected quota, or delete manage the account.
.png)
Step:3 View and edit email accounts that are associated with your domains. Use the filter to find required email addresses, preview its selected quota, or delete manage the account.

_______________________________________________________________________________________________________________________________________________
Step:1 For using Email Forwarder click on the Email Forwarder tab under Manage Account Section.

Step:2 In this section, you can set up email forwarders and choose from several destination options to adjust mail forwarding perfectly to your needs.

Step:3 Press the 'Create Email Forwarder' button, specify the forwarded email, and define the destination addresses.
 __________________________________________________________________________________________________________________________________________________
Step:1 For creating a new FTP account click on the FTP access tab under the Manage Account Section.

Step:2 In the very first section, you are given the possibility to manage your FTP access or create new FTP accounts. FTP access management is dependent on the system your Plesk panel is set upon.

Step:3 Add and configure FTP Accounts in the easiest way possible. Just type in your login on a domain, provide or generate a secure password, define the directory access, and declare available quota.
Note: if you have some other addon domains, creating an FTP account on the main domain will also add it to these domains.

________________________________________________________________________________________________________________________________________________________________________________
Step 1: Log in to your client area from https://manage.diadem.in/ and once the login is done click on Services.

Step 2: Now click on the Manage button as shown in the screenshot.
.png)
Step 3: Once you scroll down you will get the Resource Usage section under which you can view your usage detail.

Note: you can also login to the Plesk panel and view your Website statistics as well by clicking on the below-mentioned icon available in the client area under the Under One Click login Section.
