FortiClient ZTNA Edition Install & IPsec VPN Setup on AlmaLinux 9
Applies to: AlmaLinux 9 (RHEL 9 compatible), FortiClient Zero Trust Fabric Agent (ZTNA Edition)
Purpose: Install FortiClient on AlmaLinux 9 and configure an IPsec (IKEv2) VPN connection to the office FortiGate.
1. Overview
We first installed the FortiClient VPN-only client on AlmaLinux 9. After launching it, the VPN configuration screen offered no IPsec VPN option, so it could not be used for our IPsec/IKEv2 tunnel.
Resolution: Remove the VPN-only client and install the ZTNA Edition of FortiClient, which includes the IPsec VPN, SSL-VPN and XML configuration tabs.
Note: The FortiClient VPN-only edition does not show the IPsec VPN option. Always use the ZTNA Edition when an IPsec VPN is required.
2. Prerequisites
- AlmaLinux 9 with a desktop environment (FortiClient is a GUI application)
- A user with sudo / root privileges
- Internet access to download the package
- VPN details from the network team: Remote Gateway IP, Pre-shared Key, Username
- Outbound access to the gateway on UDP 500, UDP 4500 (NAT-T) and TCP 5500 (fallback)
3. Remove the VPN-only client (if installed)
rpm -qa | grep -i forti
sudo dnf remove forticlient_vpn # use the exact package name shown above
4. Download the ZTNA Edition
- Open: https://www.fortinet.com/support/product-downloads/linux
- Select FortiClient ZTNA Edition (not the "VPN only" edition) for RHEL / CentOS (.rpm), 64-bit.
- Download the .rpm file (for example to ~/Downloads).
Note: The download page may require a Fortinet support account login depending on the release.
5. Install on AlmaLinux 9
Add the Fortinet repo:
sudo dnf config-manager --add-repo https://repo.fortinet.com/repo/forticlient/8.0/el/os/x86_64/fortinet.repo
If using ARM64, use this instead:
sudo dnf config-manager --add-repo https://repo.fortinet.com/repo/forticlient/8.0/el/os/aarch64/fortinet.repo
Install FortiClient:
sudo dnf install forticlient
Launch FortiClient from the application menu, or from a terminal:
forticlient -gui
Note: "Disconnected / Untrusted Network" on the home screen is normal before a VPN is configured and connected.
6. Add the IPsec VPN connection
- Open FortiClient and go to the VPN tab.
- Click the three-dot menu at the top right of the VPN panel.
- Click Add Personal VPN.
- In the Edit VPN Configuration window, make sure the IPsec VPN tab is selected.
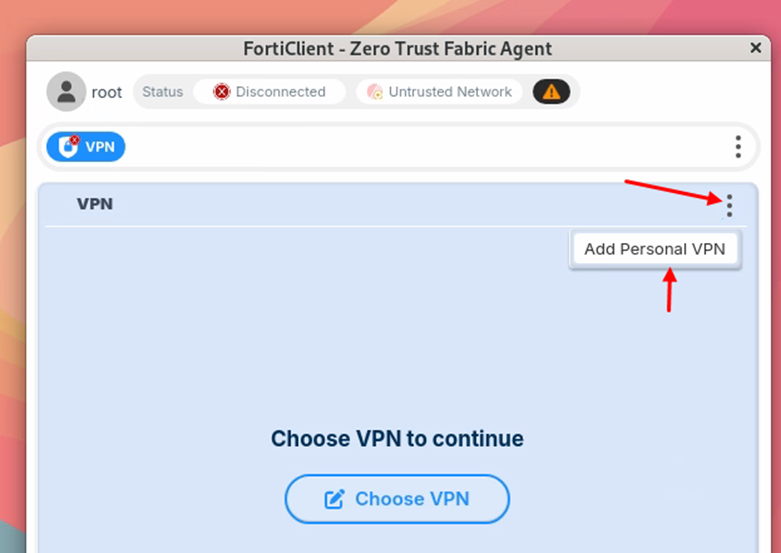
Figure 1: VPN tab > three-dot menu > Add Personal VPN
6.1 General settings
|
Field |
Value |
|
Connection Name |
Diadem |
|
Description |
(optional) |
|
Remote Gateway |
103.227.62.4 |
|
Authentication Method |
Pre-shared key |
|
Pre-shared key |
(enter the key provided by the network team) |
|
Authentication (EAP) |
Save Login |
|
Username |
Diadem |
|
Enable SSO for VPN Tunnel |
Unchecked |
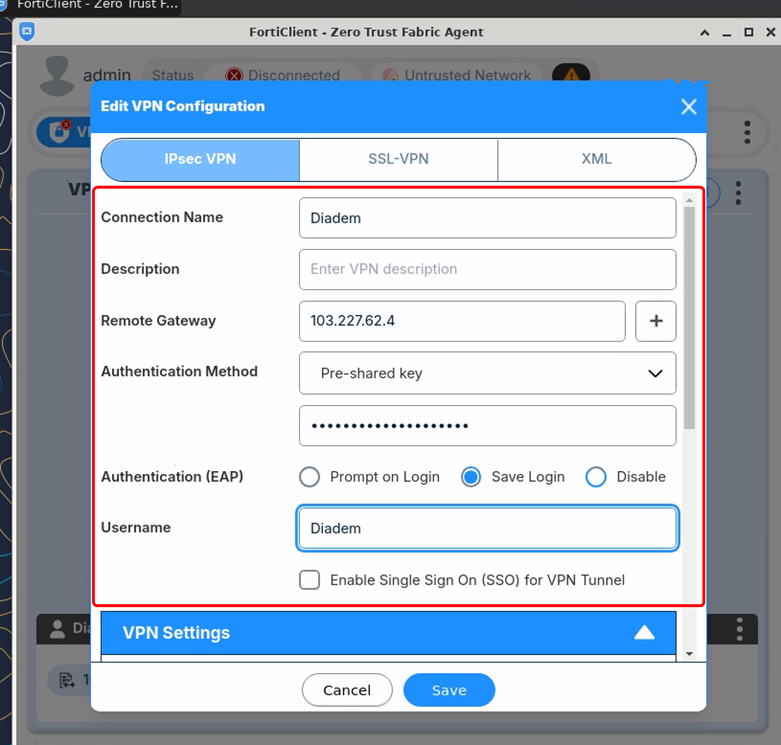
Figure 2: General settings (pre-shared key masked)
6.2 VPN Settings
|
Field |
Value |
|
IKE |
Version 2 |
|
Options |
Mode Config |
|
Mode Config Type |
IPv4 |
|
Encapsulation |
Auto (UDP fallback TCP) |
|
IKE UDP Port |
500 |
|
IKE TCP Port |
5500 |
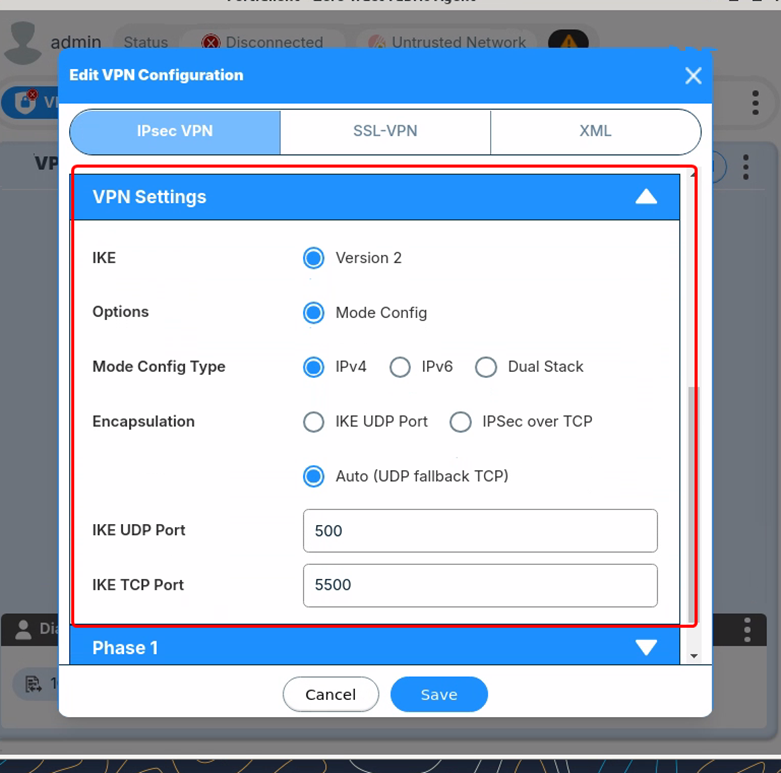
Figure 3: VPN Settings
6.3 Phase 1
|
Field |
Value |
|
IKE Proposal 1 |
Encryption AES128, Authentication SHA1 |
|
IKE Proposal 2 |
Encryption AES256, Authentication SHA256 |
|
DH Group |
21 only (all others unchecked) |
|
Key Life |
86400 seconds |
|
Local ID |
Blank (optional) |
|
Network ID |
0 |
|
Dead Peer Detection |
Checked |
|
Enable Local LAN |
Checked |
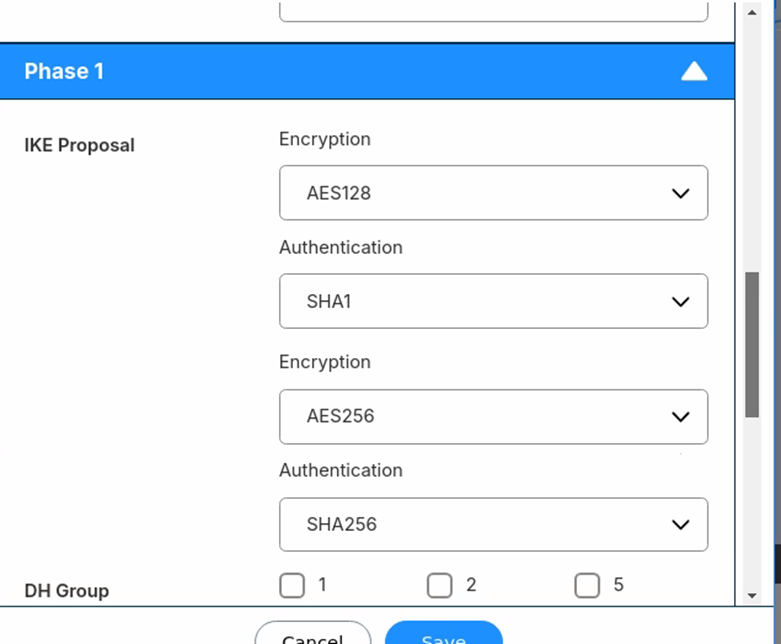
Figure 4: Phase 1 IKE proposals
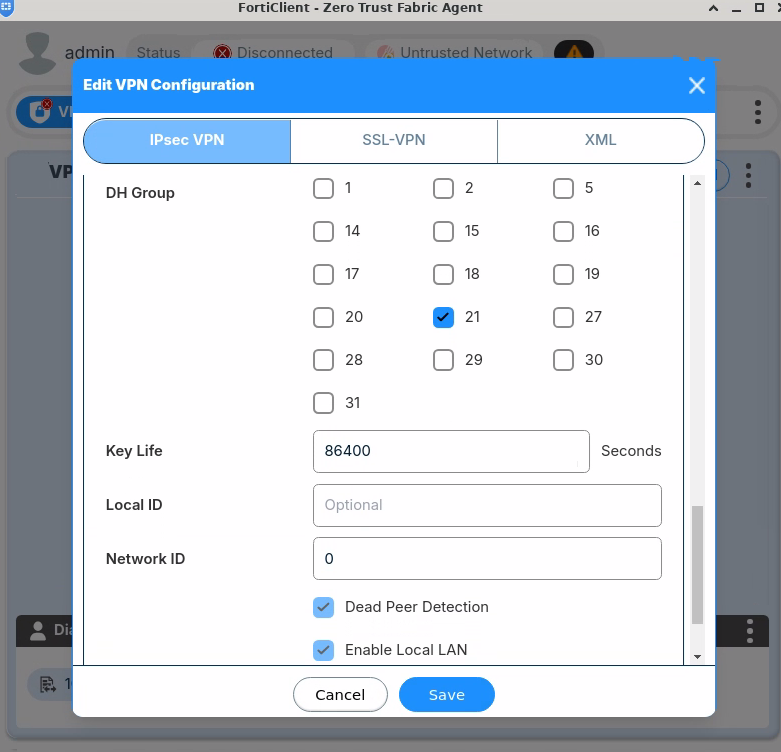
Figure 5: Phase 1 DH group 21, key life, DPD and Local LAN
6.4 Phase 2
|
Field |
Value |
|
IKE Proposal 1 |
Encryption AES128, Authentication SHA1 |
|
IKE Proposal 2 |
Encryption AES256, Authentication SHA256 |
|
Key Life (Seconds / KBytes) |
Both unchecked (defaults 43200 / 5120) |
|
Enable Replay Detection |
Checked |
|
Enable Perfect Forward Secrecy (PFS) |
Checked |
|
DH Group |
21 |
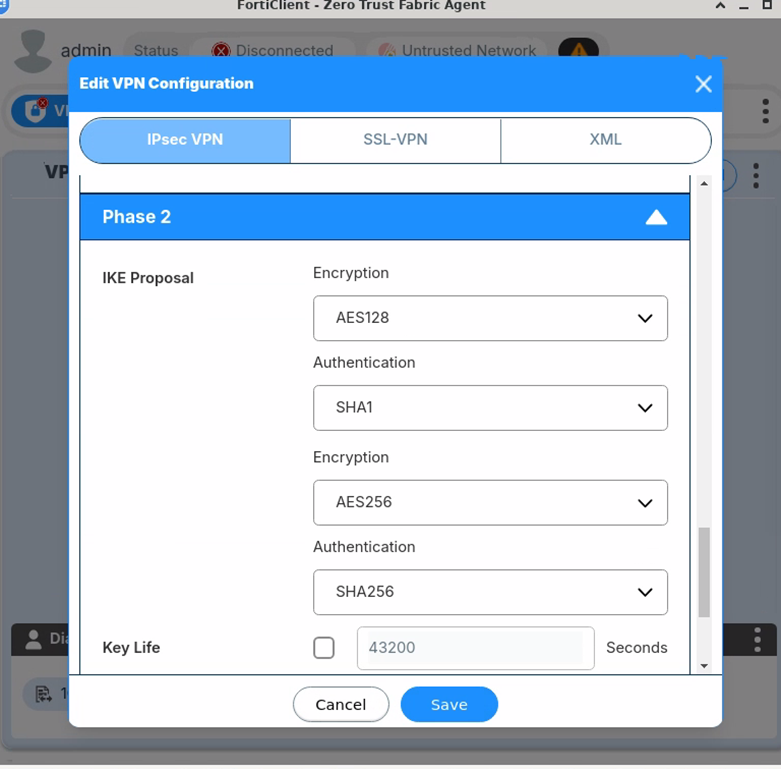
Figure 6: Phase 2 IKE proposals
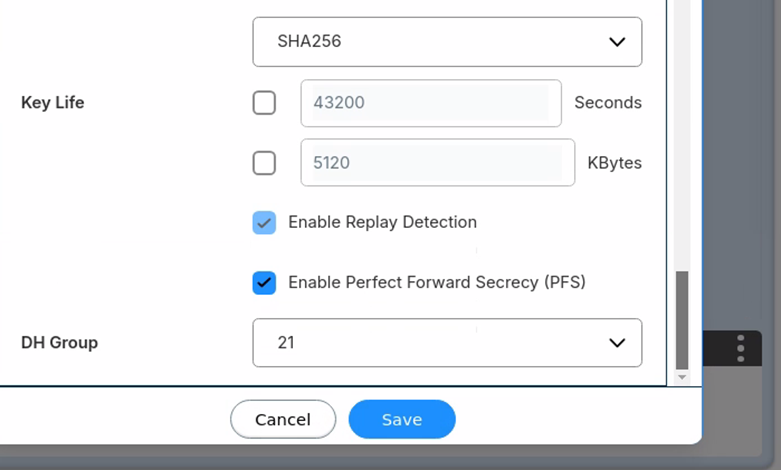
Figure 7: Phase 2 replay detection, PFS and DH group 21
Click Save when all settings are entered.
Note: Phase 1 and Phase 2 proposals and the DH group (21) must match the FortiGate side exactly, otherwise the tunnel will fail to negotiate.
7. Connect to the VPN
- In the VPN tab, choose the Diadem connection (Choose VPN).
- Enter the Username (Diadem) and password when prompted.
- Click Connect.
- Status should change to Connected, showing the assigned IP and tunnel duration.
Verify on AlmaLinux:
ip a | grep -i -E "vpn|ppp|tun"
ip route
ping <internal-server-ip>
8. Troubleshooting
|
Symptom |
Possible cause / fix |
|
No IPsec VPN tab |
VPN-only edition installed. Remove it and install the ZTNA Edition (Sections 3-5). |
|
Stuck at 10% / 40% while connecting |
Check gateway IP, pre-shared key, and firewall access to UDP 500 / 4500 / TCP 5500. |
|
Negotiation fails (no proposal chosen) |
Phase 1 / Phase 2 encryption, authentication or DH group (21) does not match the FortiGate. |
|
Authentication failed |
Re-check username/password; confirm the user is allowed on the FortiGate. |
|
Connects but cannot reach internal hosts |
Check routes (ip route), DNS settings and the FortiGate firewall policy for the VPN user. |
|
dnf install error |
Confirm the Fortinet repo was added (dnf repolist) and re-run sudo dnf install forticlient. |
9. Summary of Steps
- Installed the FortiClient VPN-only client: IPsec VPN option not available.
- Removed the VPN-only client.
- Downloaded the ZTNA Edition from fortinet.com/support/product-downloads/linux.
- Added the Fortinet repo and installed it on AlmaLinux 9 using dnf install forticlient.
- Added a Personal VPN and configured IPsec VPN (IKEv2, Phase 1/Phase 2, DH Group 21).
- Saved the configuration and connected successfully.
Do not store the pre-shared key or user passwords in this document. Obtain them from the network/security team.