Zimbra filter works as rules set in MUAs and in this filter we can organise our inbox according to our need, create folder move important mails and specific mails to folders. The process is shown as below:
The key benefit is that the filter are activated as soon as the email reaches your inbox and it is not dependent on individual filters set on your local email or mobile clients.
To create a filter kindly login to the webmail from the given below link:
URL: https://webmail.yourdomain.com/
User Name: admin@yourdomain.com
Password: ********
Now to create Filter rules you needs to navigate to "Preferences" > "Filter" , in the filter section there are two types of filtering:
i) Incoming Message Filter: This filter will be effective for incoming messages only
ii) Outgoing Message Filter: This filter will be effective for outgoing messages only.

How Do Filters Work?
Mail filters are a set of user defined conditions that are checked against incoming email. When an incoming email meets any of the user defined conditions, the filter performs user defined actions on the email.
For adding incoming filter policy click on Incoming Message Filter and the Create Filter accordingly.
Step 1:

Step 2:

A filter condition is constructed by choosing a comparison field and then choosing a comparison operator and completing any operator fields. These two parts instruct the filter what part of an email to check, and for what content to check.
You can create multiple filter conditions. Using multiple filter conditions help refine filters and allow you to look for very specific types of email. Less filter conditions will create broader filters that can catch a variety of different emails.
From: Use this option to specify a From name in an email message.
To: Same as From, but looks for the specified names in the To header.
CC: Same as From, but looks for the specified names in the Cc header.
Subject: Use this to specify a Subject header in an email message.
Size: Use this option to select email messages that are larger or smaller than a specified size, including any file attachments. You can use this to discard email messages that are too large.
Date: Use this option to specify email messages sent before or after a specified date.
Body: Use this option to specify words that are contained or not contained in the Body of the email.
Attachments: Use this option to filter for email messages with or without attachments.
Address In: Use this option to check if an address appearing in a field of an incoming messages (such as From, To, Cc, and Bcc) is or is not in one of your address books.
Header Named: When this option is selected, an additional text input field appears before the comparison operator (the contains field). This field allows you to specify any email header. You can specify the standard fields of To, From, Date, Reply-To, or other custom fields that may be included in the message header. You could use this option to filter out email messages that have malformed headers, meaning they do not contain certain information that is normally considered standard for an email message. Sometimes spam, which is automatically generated, omits information such as the Sender or Reply-To fields. Use the second text field (the field immediately to the right of the compariosn operator) to specify for which header to test.
Step 3:

Matches exactly/Does not match exactly: Specifies an exact match.
Contains/Does not contain: Specifies that the subject line must contain the specified substring.
Matches wildcard condition/Does not match wildcard condition: Specifies that the subject must match the specified string, which includes wildcards.
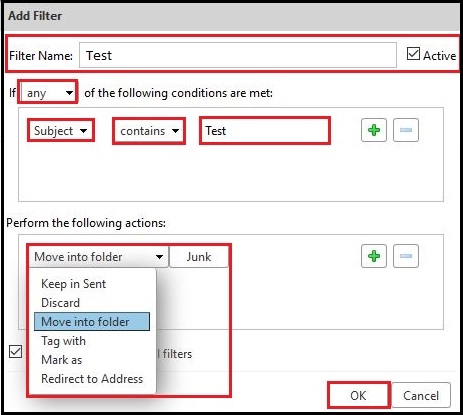
Step 4:

Keep in Inbox: Saves email to your Inbox. If none of the filter rules match an email, this action takes place by default.
Discard: Deletes the email message without delivering it. The message is not in any of your folders, not even Trash.
File into Folder: Moves the email to a specified folder.
Tag with: You can tag matching messages with a selected tag.
Mark as: Select as Read or Flagged.
Redirect to Address: Send the mail to a particular email addresses.
Select the specific action now the filter is almost ready to deploy, before deploying we should enter the Filter Name and then click OK.
For adding incoming filter policy click on Outgoing Message Filter and the Create Filter accordingly.
The Outgoing Message Filter setup is also same as the Incoming Message Filter, the simple steps are given as below:
Step 1:

Step 2:

Step 3:

Step 4:
This is the process of adding Outgoing Message Filter policies.
Example of filtering, mails from a particular email address will be moved in a particular folder, the same also synchronized in outlook as shown in the below:
In Webmail:

In Outlook:
