|
Article ID: 554
Last updated: 16 Aug, 2021
Zimbra desktop is an offline client that lets you manage your various email accounts in one desktop tool. Zimbra mail, Yahoo! mail, Gmail, Outlook and any other work or personal email account using POP or IMAP is easy to set up in zimbra desktop. Each account is separately maintained. For downloading zimbra desktop software, please follow the below given link. Link: https://www.zimbra.com/downloads/zimbra-desktop/
You can use zimbra desktop to access your email account if it runs Zimbra. This includes email messages, folders, address books, calendars, task lists, and briefcase documents. To access a Zimbra account via a browser use the Zimbra Web Client. Setting up your Zimbra web client (ZWC) account.When the first time you open zimbra desktop you are asked to set up an account. You can set up additional accounts at any time. Before you begin to set up an account, make sure you are connected to the Internet. Step: 11. Open zimbra desktop and click Add New Account to open the account type list.
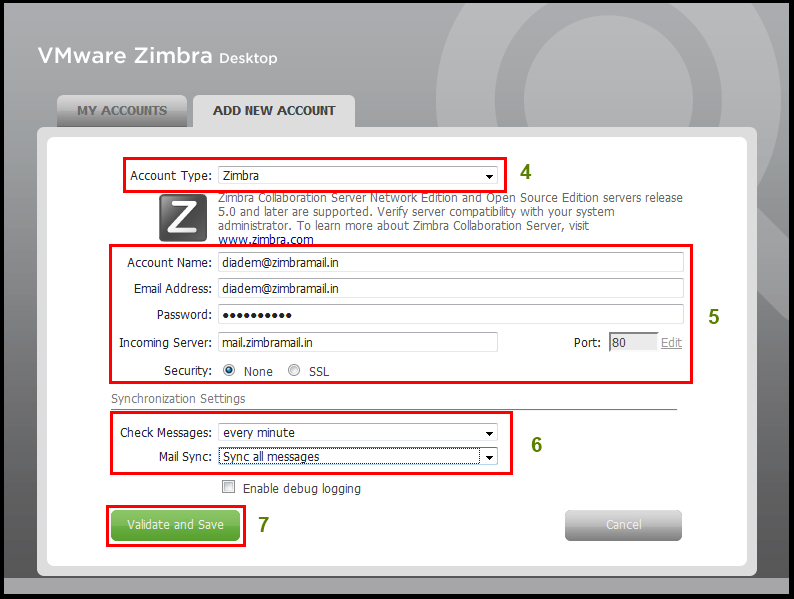
Step: 22. Now click the ADD NEW ACCOUNT tab. In the Account Type list, select Zimbra. The Zimbra account setup page displays. Enter the following information.
Step: 33. In the Account Name field, this is the name that displays as the account name in zimbra desktop. Each account must have a different name. 8. From Synchronization Settings, select how often zimbra desktop should get data from your account. The default is to check messages and sync as new mail arrives. If you select manually, you must click Send/Receive on the zimbra desktop toolbar to synchronize your account with the Zimbra server. If you select too short of time, such as every minute, your computer’s performance could be impacted. You can change this setting any time by clicking Setup and editing the account. 9. For a faster synchronization you may select to sync a fixed or relative date range. 10. When you are finished, click Validate and Save (Zimbra desktop validates your account information. If your account is successfully validated, you see the Service Created dialog. If your account is not successfully validated, you are returned to the Account Setup dialog so you can review and make corrections).
or
Step:411. To open desktop, click Launch Desktop. You can start to work in zimbra desktop as your accounts are being synchronized.
Step: 5
Synchronize Global addressbook with zimbra desktop - GAL Sync (Global Address List Synchronization)Step: 1After installing Zimbra account, now for synchronize the address book. Please follow the below given steps. a. Select Find Shares option from the left panel.
b. Select Global Address List option.
c. Search the galsync email id from server to connect the addressbook.
d. Check the internalGAL option. And select ADD to connect and synchronize.
.png) Step: 24. Now we can find all contacts have synchronized on addressbook and the synchronization will continue time to time.

This article was:
Report an issue
Article ID: 554
Last updated: 16 Aug, 2021
Revision: 23
Views: 11669
Comments: 0
|


Powered by KBPublisher (Knowledge base software)